Friday, December 23, 2011

Holiday Baking: La Buche de Noel


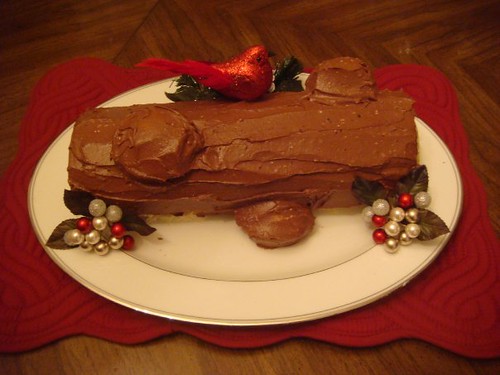
I wanted to share one of my very favorite holiday recipes. This is the French 'Yule log' cake that I make every year...la buche de noel! I got this recipe when I was in eleventh grade or so, and I have made it just about every year since for my family.

This cake is not for the faint of heart...it is a bit labor intensive. Having a KitchenAid for the past couple years REALLY helped with the 'beat for five minutes' instructions!


La Buche de Noel

Cake Ingredients:
4 eggs
1 cup sugar
½ cup water
1 tsp vanilla extract
1 ¼ cups cake flour
1 ¼ tsp baking powder
¼ tsp salt
½ cup

Filling Ingredients:
1 cup heavy whipping cream
½ tsp vanilla extract
3 tbsp confectioners’ sugar

Frosting Ingredients:
½ cup unsalted butter
Pinch of salt
2 tbsp plus 2 tsp heavy cream
½ tsp vanilla extract
2 cups confectioners’ sugar

Preheat an oven to 375 degrees F, Butter or grease a jelly-roll pan. Press an approximately 16x12 inch sheet of waxed paper into the pan with your fingers. Remove the paper, turn it over, and place it back into the pan, pressing it into place, to grease both sides. With scissors, trim off any excess paper. Butter, grease, or line two 2-inch center cups of a muffin tin. Set aside.

To make the cake, in a large bowl, using the electric mixer set on high speed, beat the eggs until thick and lemony, about 5 minutes. Add the sugar and continue to beat on high for 5 minutes. On low speed, beat the water and vanilla. Sift together the cake flour, baking powder, and salt into the batter, and beat until just combined.

Spoon 2 to 3 tablespoons batter into each cupcake cup. Pour the remaining batter into the prepared baking pan. Tilt the pan to evenly spread the batter. Place the baking pan in the oven and bake until the cake springs back when lightly touched and just begins to turn golden (about 10 minutes). Bake the cupcakes until they just begin to turn golden, about 10-12 minutes. Let the cake and cupcakes cool on a wire rack for five minutes.

Lay a clean kitchen towel on a countertop. Sift confectioners’ sugar over the towel. Invert the cake onto the towel and peel off the paper. Beginning at the long side, roll up the cake with the towel. Refrigerate the cake roll for 30 minutes.

To make the filling, in a bowl using the electric mixer set on medium-high speed, beat the cream until it begins to thicken. Add the vanilla and confectioners’ sugar and continue to beat until firm peaks form and the mixture is spreadable.

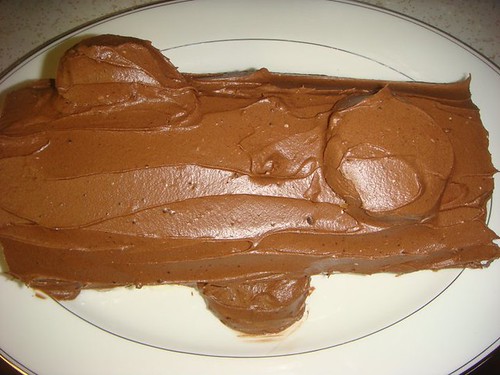
To make the frosting, in a large bowl, using the electric mixer set on low speed, beat together the butter, cocoa, and salt until well mixed (about 3 minutes). Drizzle in the cream and vanilla and continue to beat on low speed until blended. Slowly add the confectioners’ sugar, beating until blended. On medium, beat until light and fluffy (about 2 minutes)

To assemble, remove the cake from the refrigerator and unroll it on a counter. Spread the filling on top within 1 inch of the edges. Beginning at the long side, carefully roll up the cake, removing the towel. Place cake on top of two dollops of frosting to hold to platter. Ice the cake. You can use the cupcakes as branches or bumps on the log. Decorate with chocolate leaves, animals, holly sprigs, etc to give the cake a “woodsy” or “log” look.

Thursday, December 22, 2011

Christmas Baking Week: Chocolate Mint Dreams


These are a new cookie for me this year, and one that I have been dying to try. I got my hands on some peppermint extract early on in the baking season, and finally gave them a go.

Chocolate Mint Dreams are a bit labor intensive. You have to first bake, then ice, and then drizzle these bad boys (lazy baker that I am, I haven't drizzled them yet!) In years past I made a smiliar cookie; a Chocolate Mocha Pretzel, which was dipped in chocolate and then drizzled once dry. This is the first Christmas of 'replacing' them with a similar, yet fairly different cookie. I think I like these better!

Chocolate Mint Dreams
¾ cup butter, softened
1 cup confectioners’ sugar
2 squares (1 ounce each) unsweetened chocolate, melted and cooled
¼ teaspoon peppermint extract
1 ½ cups all-purpose flour
1 cup miniature semisweet chocolate chips

Icing
2 tablespoons butter; softened
1 cup confectioners’ sugar
1 tablespoon milk
¼ teaspoon peppermint extract
1 to 2 drops green food coloring

Drizzle
½ cup semisweet chocolate chips
½ teaspoon shortening

In a large mixing bowl, cream butter and confectioners’ sugar. Beat in chocolate and mint extract. Gradually add flour. Stir in chocolate chips (dough will be soft).

Drop by tablespoonfuls 2 in. apart onto un-greased baking sheets. Bake at 375° for 6-8minutes or until firm. Cool for 2 minutes before removing to wire racks to cool completely.

Meanwhile, combine icing ingredients; spread over cooled cookies. Let set. In a microwave, melt chocolate chips and shortening; stir until smooth. Drizzle over cookies.

Yields 4 ½ dozen.

Wednesday, December 21, 2011

Christmas Baking Week: Holiday Gumdrop Cookies


These are a first for me, this year. Even though Riley probably couldn't even chew one of these, I felt like it was finally appropriate to make this fun little cookie. Chopping the gumdrops isn't the most fun in the world, but it got done, and the cookies got baked and taste tested.

I can't stand on baking and cooking websites when a reviewer says, "This is great, but I added this this this and this and didn't do this that or that." Aka, we made it a totally different recipe. That being said...I omitted walnuts. I don't like nuts in cookies. I also subbed margarine for shortening. Shoot me. ;)

Holiday Gumdrop Cookies
1 ½ cups spice gumdrops
¾ cup coarsely chopped walnuts
½ cup golden raisins
1 ¾ cups all-purpose flour, divided
½ cup shortening
1 cup packed brown sugar
1 egg
¼ cup buttermilk
½ teaspoon baking soda
½ teaspoon salt

Cut gumdrops into small pieces, reserving black ones (if included) Place gumdrops in a bowl. Add walnuts, raisins, and ¼ cup flour; toss to coat. Set aside.

In a mixing bowl, cream shortening and brown sugar. Add egg; beat in buttermilk. Combine baking soda, salt, and remaining flour; stir into creamed mixture. Add gumdrop mixture and mix well. Chill for 1 hour.

Drop by rounded teaspoonfuls 2 in. apart onto un-greased baking sheets. Bake at 400 for 8-10 minutes. Cool for 2 minutes before removing to wire rack. Yield about 3 dozen.

Tuesday, December 20, 2011

Christmas Baking Week: Spritz Cookies


Spritz, cookie-gun, plain old butter cookies, whatever you want to call them, they are bite-sized and DELICIOUS. Even a small batch makes a ton of cookies, so they are a great option to throwing in a tin and carting into work. Don't expect to bring any home though!

There are a lot of cookie guns around, and they are nothing revolutionary. Women have been shooting out cookies for decades. The mechanisms have definitely improved over the years, though. I remember my mom refrigerating dough, scraping mishapen cookies off of the pan, and one particular Christmas, practically giving up altogether because the gun was so uncooperative.

I bought my mom and myself a Wilton Cookie Pro II one year. They were on sale at AC Moore, and figured, for fifteen dollars or so, what could I lose? I steeled myself for trashed cookie dough and hours of labor. Instead, my little gun spit out about two dozen perfect cookies and was ready for a reload. I was astounded. I didn't know spritz could be that easy.

I love these cookies for the taste, the versatility, and the number of cookies the recipe produces. You can use a multitude of shapes, including Christmas trees, wreaths, and my family's standby, the five petal cookie. The trees and wreaths can just get dusted in green sugar, while the petal cookies get a sweet little spurt of icing in the middle. Either way, the almond flavoring in this recipe set these cookies apart from so many others.

Spritz Cookies
1 cup butter
¾ cup sugar
1 tsp almond extract
1 egg
2 ¼ cups flour
¼ tsp salt

Beat butter until smooth.

Add sugar.

Add egg and almond extract

Combine flour, salt, and baking powder. Add in three portions and mix well.

Pack dough into cookie gun, using a shape of your choice. Bake at 350° 8-10 minutes.

Icing for Spritz
¼ cup butter
2 cups confectioner’s sugar
1 tsp almond extract
1 tsp cream or milk

Combine ingredients and ice cookies.

Monday, December 19, 2011

Christmas Recipe Week: Lemon Ginger Cookies

This week is going to be a baking blitz for me. I have a list of over a dozen types of cookies that need to be made, baked, iced, and shared amongst friends, family, and coworkers. The culmination of this baking week is La Buche de Noel, prepared on Christmas Day (or maybe Christmas Eve this year, as I am off!) I thought that maybe as a much needed reward/break might be sharing a few of my favorite recipes on here, in case anyone wants a new or different take on a recipe to try this holiday season.

To start I'd like to highlight one of my newer recipe finds; lemon ginger cookies. These cookies have a terrific flavor and are not too sweet. They do well served with tea or without, and are REALLY easy to make. I have four baking pans, and since the recipe only makes two dozen, I was already cleaning up while the first sheet was baking (perfect for marathon baking! My next type of cookie was mixed before they were done!)

I will always post a photo or two of the recipe results. I always prefer to see what a cookie or cake looks like before attempting it!


Soft Lemon-Ginger Cookies

½ cup butter, softened
1 cup packed brown sugar
1 egg
3 tablespoons sour cream
½ teaspoon lemon extract
½ teaspoon vanilla extract
1 ¾ cups all-purpose flour
1 teaspoon baking soda
1 teaspoon cream of tartar
1 teaspoon ground ginger
¼ teaspoon salf

In a mixing bowl, cream butter and brown sugar. Beat in the egg, sour cream and extracts. Combine the flour, baking soda, cream of tartar, ginger and salt; gradually beat into creamed mixture.

Drop by rounded teaspoonfuls 2 in. apart onto un-greased baking sheets. Bake at 350° for 10-12 minutes, or until lightly browned. Immediately remove from pans to wire racks. Yields 2 dozen.

Look for tomorrow's post a bit earlier than this one!

Wednesday, December 14, 2011

Making Christmas!

The Christmas spirit has been slow to hit the household...including the Blythe household.

Before we put up our tree (which entails moving the table, my prime sewing spot) I decided to give Christmas dresses a go. The fabric was not cooperative, and the end product was pretty hideous. I was determined to come out of this sewing funk with at least one piece of usable something...so I tried whipping up a tree skirt. My first attempt was a go...for size and the finish of it. I was surprised I didn't even miss the underside of the double fold bias tape!

I was inspired to photograph Cassie as if she were sewing for Christmas, so I dressed her up, grabbed some minis and my light, and created this little set up.


The best part? It fit the tree perfectly, and while I was sewing it, hubby cut down the base of the tree so it can fit in the girls NEW LIVINGROOM! That's right, he finally helped me assemble it the other day. I painted one evening, and now we just need furniture!

Here's hoping that a few more Christmas projects, sewing projects, and dolly projects happen around this season. I would love to bring a few more blog posts to the table as well. Happy holidays!

Wednesday, December 7, 2011

Kozy Fever

It's happened at long last...

One of the dolls that I first looked at and thought, "Ack, why would anyone pay THAT much for THAT ugly doll???" has me falling hard for her.


I know I just brought my Azzie home, but Kozy fever was brewing before that, and now it is boiling over! I found this perfect little beauty on the bay, and I would loooove to have her for a Christmas present.

I am so stuck on the BLs lately that I can't even consider other molds until I have a Kozy and maybe a Rosie. I know that even though I say that I don't want a Goldie (too showy and definitely too hyped), Hollywood (can't get past her hair. Ick), or a Sunday Best (too much like Mondie but not as cute!) that it's probably just a matter of time. I think the BLs are my favorite mold, even though I love Cassie and the others.

Wonder when my BL family will grow...I hope it's soon! <3